Windows Hello for Business allows organizations to replace passwords with secure biometric authentication such as facial recognition, fingerprint sign-in, and a device PIN. When deployed through Microsoft Intune, administrators can centrally manage these settings and roll them out only to approved Azure AD joined computers by targeting a specific device group.
This guide shows how to create the Intune policy, assign it to a group of Azure AD joined devices, enable Use Windows Hello For Business (User) and Use Windows Hello For Business (Device), allow biometrics, and troubleshoot what users see on the endpoint. If you also manage broader sign-in security, review multi-factor authentication and Zero Trust security as part of the same rollout strategy.
Quick Visual Guide
At a high level, the deployment process looks like this:
- Create a Windows configuration profile in Intune
- Use the Settings Catalog to add Windows Hello for Business settings
- Enable biometrics, PIN, and Windows Hello for Business at both user and device levels
- Assign the policy to a specific Azure AD device group
- Sync the device and verify the sign-in options on the endpoint
- Troubleshoot facial recognition or fingerprint availability if hardware is missing
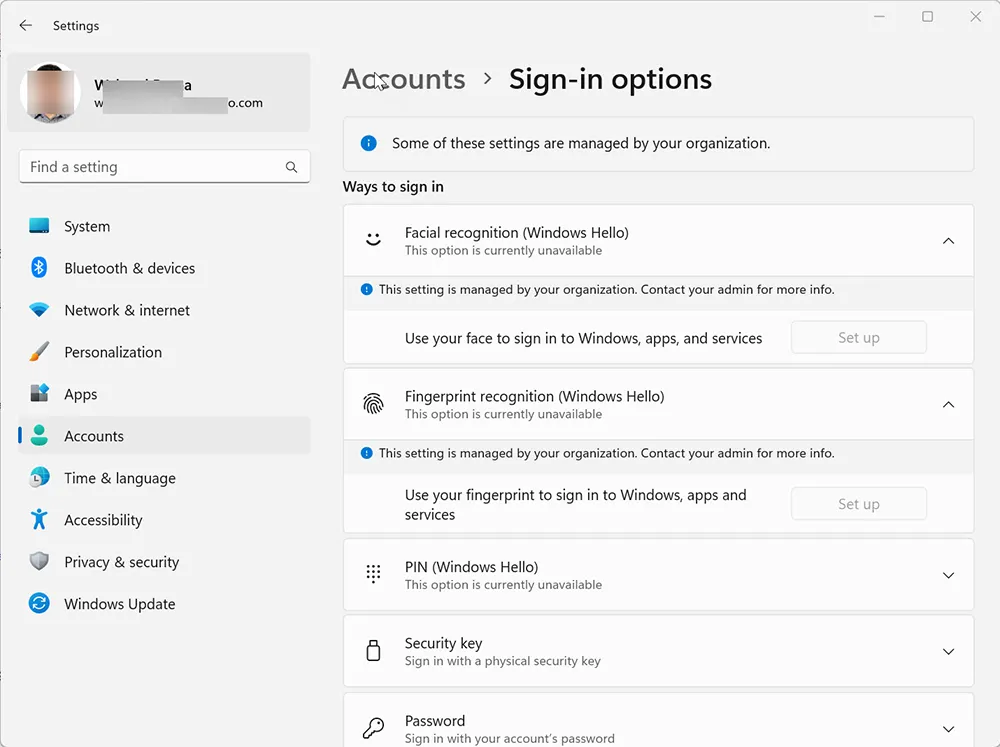
What Users See Before the Intune Policy Applies
Before the policy is deployed, Windows Hello options may appear unavailable, partially configured, or not managed. This is common when biometrics are not yet enabled through device management or when the device has not completed a policy sync.
On many Windows devices, users will open Settings → Accounts → Sign-in options and see messages such as This option is currently unavailable or Something went wrong. Try again later. Those messages do not always indicate a permanent problem. In many cases, they simply mean the policy has not finished applying or the required hardware is not present.
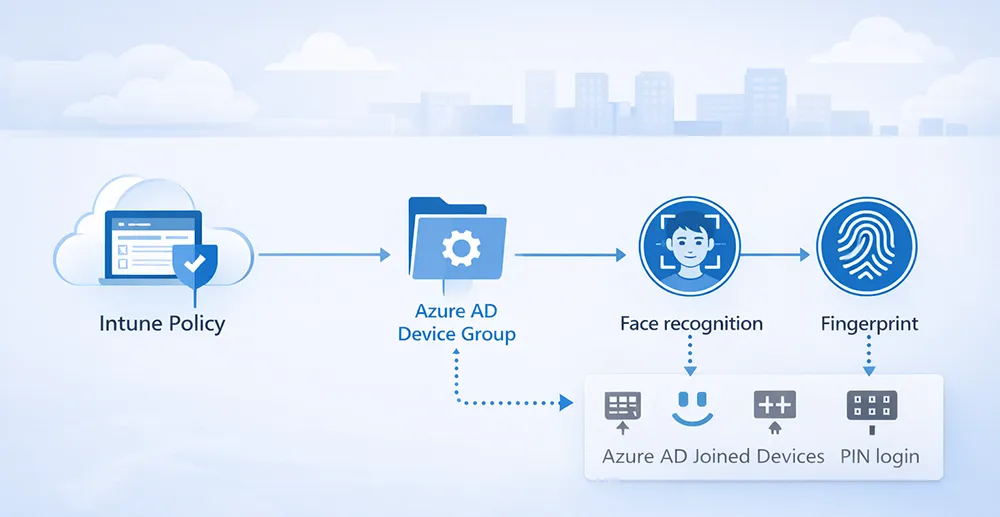
Windows Hello Deployment Architecture
In a managed environment, Windows Hello for Business is usually deployed through Intune and targeted to a specific Azure AD group. That design allows administrators to test the rollout on a limited device set before expanding to more endpoints.
A typical deployment flow looks like this:
Microsoft Intune Configuration Profile
        ↓
Azure AD Device Group
        ↓
Azure AD Joined Computers
        ↓
Windows Hello Sign-In Options
        ↓
Face / Fingerprint / PIN Enrollment
This is especially useful when you want to enable Windows Hello only for pilot devices, IT-managed laptops, or a specific business unit instead of the entire tenant.
Prerequisites Before You Deploy Windows Hello Through Intune
Before you create the policy, confirm that the deployment prerequisites are in place:
- The device is enrolled in Microsoft Intune
- The computer is Azure AD joined
- The device is running Windows 10 or Windows 11
- TPM is enabled and functioning correctly
- The device has compatible biometric hardware if you want to use face or fingerprint sign-in
If the device does not have an IR camera, facial recognition will not work. If it does not have a compatible fingerprint sensor, fingerprint sign-in will not be available. In those cases, Windows Hello PIN can still be used. If you run into Windows Hello issues after policy deployment, you can also compare symptoms with Windows Hello not working in Windows 11.
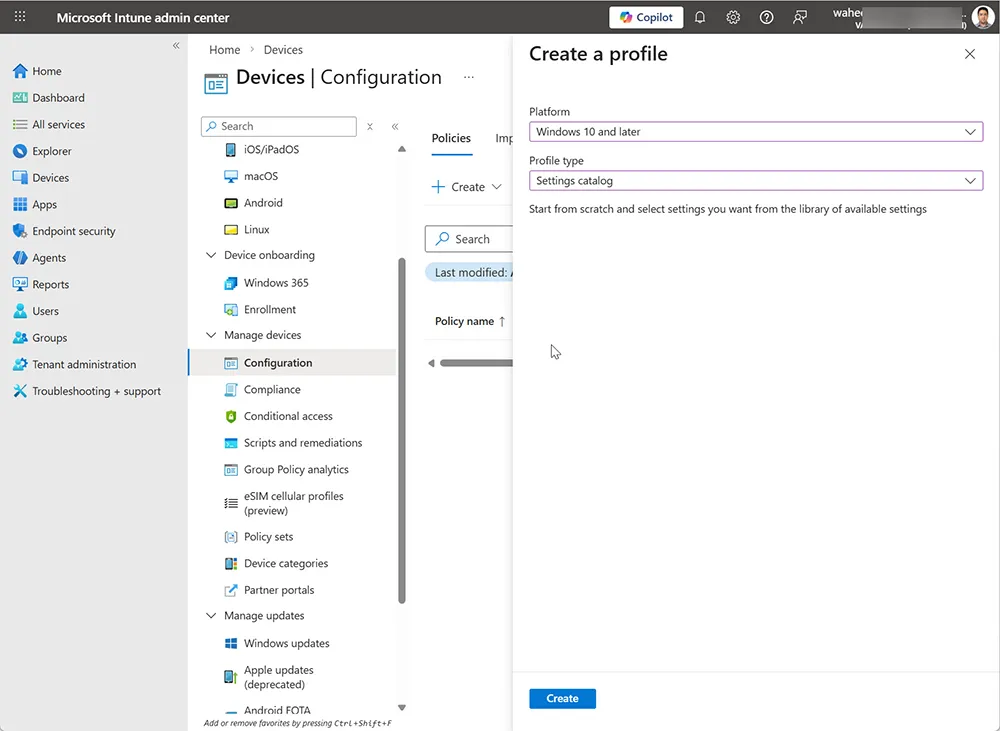
Step 1: Create the Intune Configuration Profile
Sign in to the Microsoft Intune admin center and create a configuration profile for Windows devices.
- Open Devices
- Select Configuration or Configuration profiles
- Choose Create profile
- Set the platform to Windows 10 and later
- Select Settings catalog as the profile type
Using the Settings Catalog gives you granular control and makes it easier to find the specific Windows Hello for Business settings you want to configure.
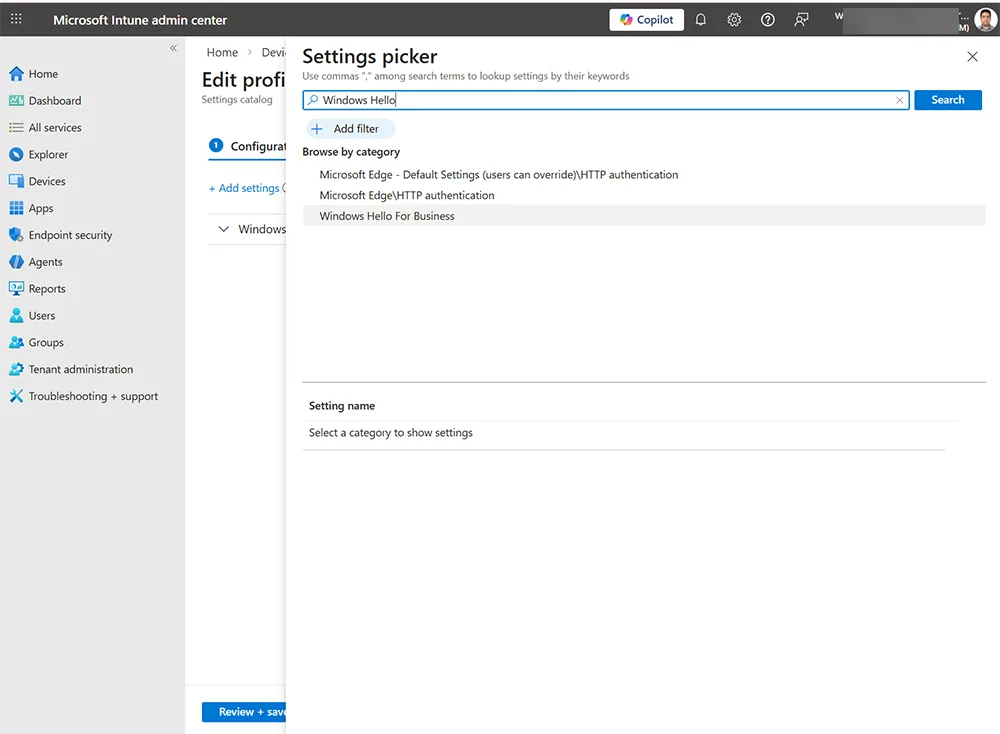
Step 2: Search for Windows Hello for Business Settings
Once the profile wizard is open, use the Settings picker to locate the Windows Hello for Business category. This is where you select the authentication settings that control biometrics, PIN behavior, and Windows Hello activation.
In your screenshots, the Settings picker is used to search Windows Hello-related options and PIN settings. This is the easiest way to build a precise policy without browsing through unrelated device settings.
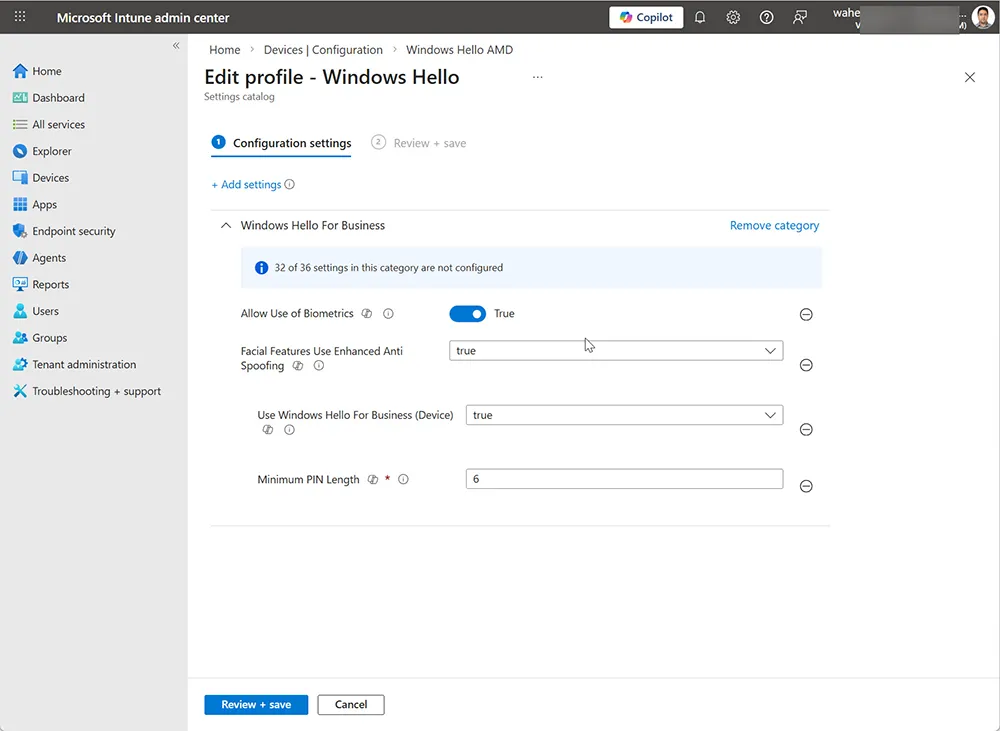
Step 3: Configure the Windows Hello Policy Settings
After adding the Windows Hello for Business category, configure the settings needed for your deployment. Based on your real-world configuration, the core settings are:
- Use Windows Hello For Business (User): True
- Use Windows Hello For Business (Device): True
- Allow Use of Biometrics: True
- Facial Features Use Enhanced Anti Spoofing: True
- Minimum PIN Length: 6
Setting Use Windows Hello For Business (User) to True enables the Windows Hello setup experience for the signed-in user. Setting Use Windows Hello For Business (Device) to True enables the device-level Windows Hello functionality. In enterprise deployments, enabling both settings gives you the most consistent enrollment behavior.
Allowing biometrics enables both face and fingerprint methods where the hardware supports them. Enhanced anti-spoofing improves the security of facial recognition by requiring a stronger verification method for supported cameras.
Recommended Policy Values for a Pilot Deployment
If you are starting with a pilot group, the following values are a practical baseline:
Use Windows Hello For Business (User): True
Use Windows Hello For Business (Device): True
Allow Use of Biometrics: True
Facial Features Use Enhanced Anti Spoofing: True
Minimum PIN Length: 6
These settings allow Windows Hello enrollment while keeping the policy simple and easy to validate on a small number of Azure AD joined test machines.
Step 4: Assign the Policy to Specific Azure AD Joined Computers
Now assign the profile to a specific Azure AD security group or device group. This is the best approach when you want to test Windows Hello on a controlled set of machines instead of your entire organization.
- Open the Assignments tab in the profile
- Select the Azure AD group that contains your target computers
- Save the assignment
This group-based approach is ideal for staged rollouts, pilot programs, and exception-based deployments. It also makes rollback easier if you need to pause the rollout.

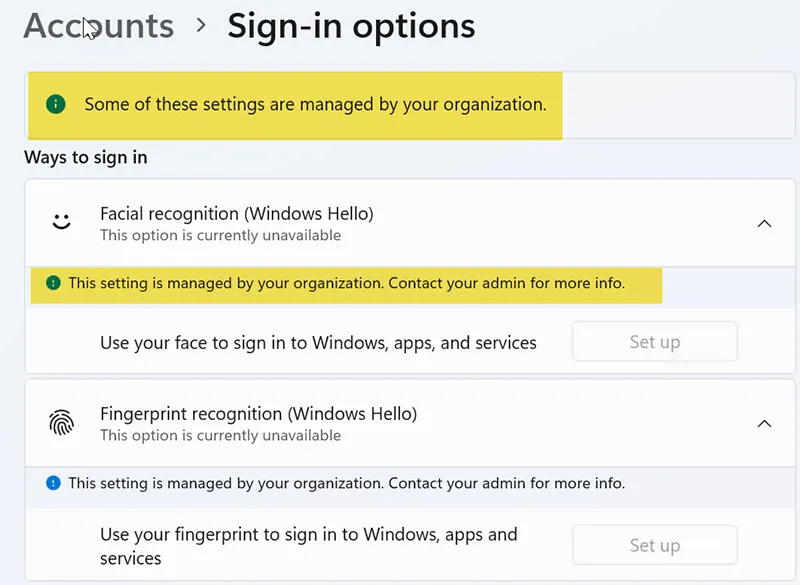
Step 5: What Users See on the Endpoint After Policy Sync
After the device syncs with Intune, users can go to:
Settings
Accounts
Sign-in options
Once the policy has applied, users typically see the message Some settings are managed by your organization. That message confirms the sign-in experience is being controlled by Intune.
At that point, users may see Windows Hello Face, Fingerprint recognition, and PIN options available or partially available depending on their hardware. If only the PIN is available, that usually means the device lacks the necessary biometric sensor.
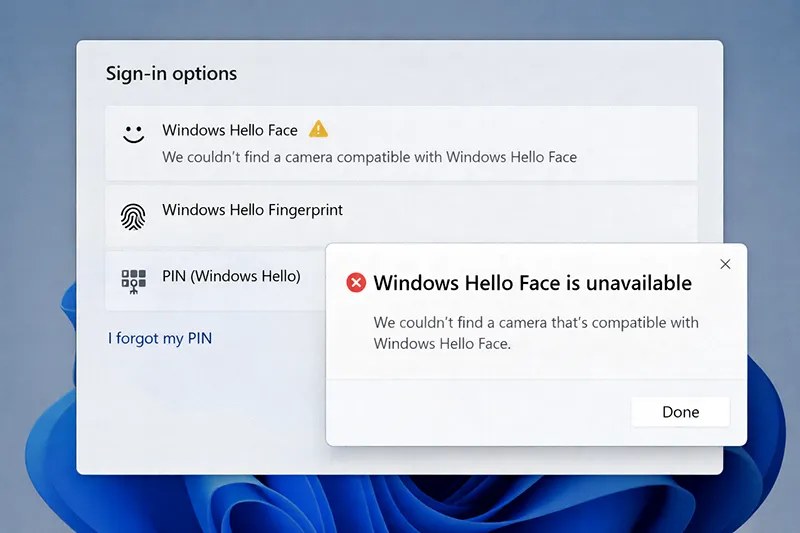
Step 6: Understand the Real-World Sign-In Option Results
Your endpoint screenshots show a very useful real-world outcome:
- Face sign-in: unavailable because no compatible Windows Hello camera was found
- Fingerprint sign-in: available and recommended
- PIN: available and recommended
This is an important enterprise takeaway: the Intune policy can successfully enable Windows Hello, but the final options users see still depend on the hardware installed on the device.
In other words, a successful policy does not guarantee that all biometric methods will appear. Face sign-in requires a supported IR camera, while fingerprint sign-in requires a compatible fingerprint scanner.
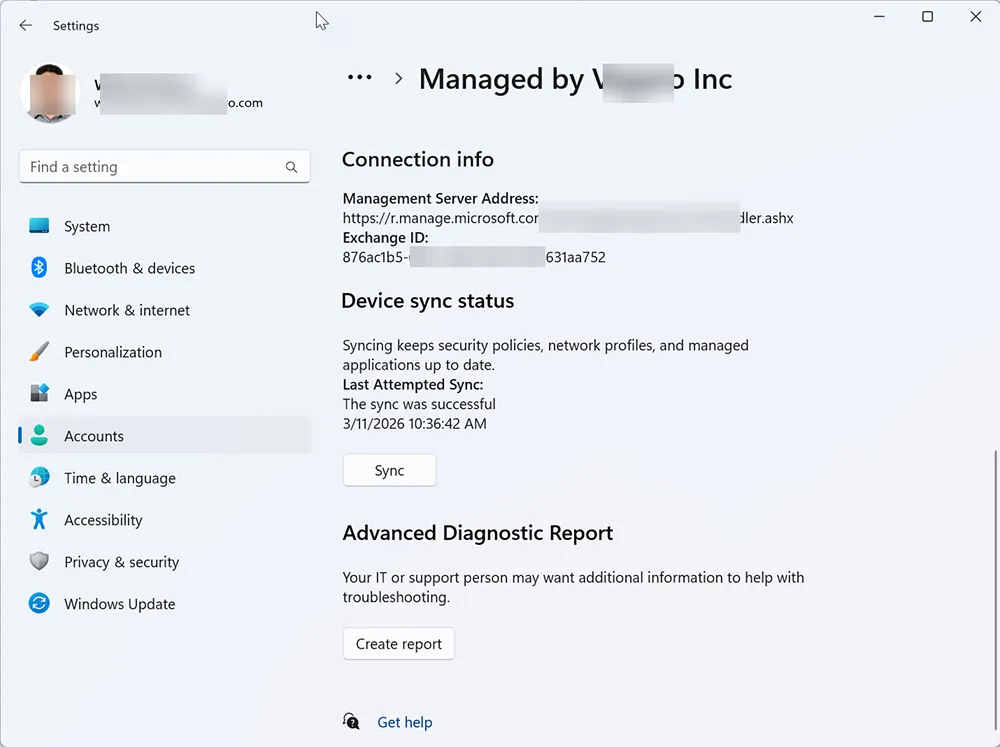
Step 7: Manually Sync the Device If the Policy Does Not Appear
If the sign-in options do not change after assignment, manually sync the device to pull the latest policy from Intune.
On the Windows device, go to:
Settings
Accounts
Access work or school
Select your connected work account
Info
Sync
This is one of the fastest ways to test whether the new Windows Hello policy has reached the device. It is especially useful during pilot deployments and troubleshooting sessions.
Common Windows Hello Intune Errors and Fixes
“Something went wrong. Try again later.”
This message often appears when the policy has recently applied but the device has not fully processed it yet. It can also appear if the device needs a restart or the TPM is not ready.
Try these fixes:
- Restart the device
- Run a manual Intune sync
- Confirm the computer is Azure AD joined
- Verify TPM health and device compliance status
“We couldn’t find a camera compatible with Windows Hello Face”
This error is hardware-related. It means the device does not have a supported Windows Hello IR camera. In this case, the policy is not the problem. Face sign-in simply cannot be enabled on unsupported hardware.
For those devices, use Windows Hello PIN or fingerprint if available. If your user also reports local Windows issues after changes or updates, compare symptoms with Windows 11 update error codes, fix frozen computer, or Windows 11 slow after update if performance is also degraded.
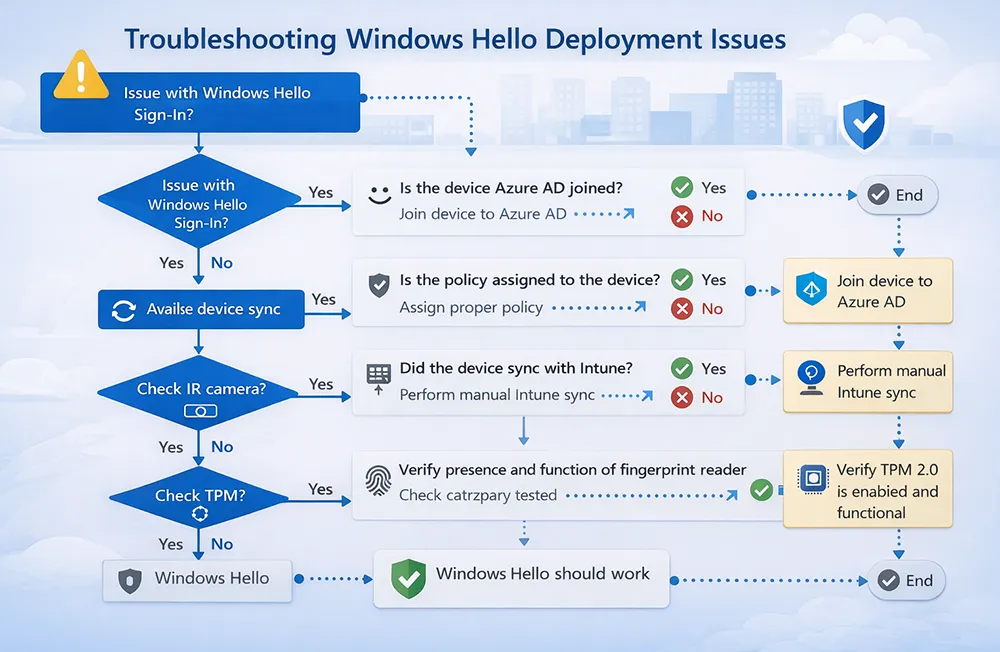
Windows Hello Troubleshooting Flow
If Windows Hello face or fingerprint sign-in is missing, work through the checks below in order:
- Confirm the device is Azure AD joined
- Confirm the device is in the assigned Intune group
- Verify the configuration profile reports success
- Run a manual sync from the device
- Check whether the device has compatible face or fingerprint hardware
- Restart the device and reopen Sign-in options
How to Verify the Policy from the Intune Admin Center
You can also validate the deployment from Intune:
Devices
Configuration Profiles
Select your Windows Hello profile
Device status
User status
If the policy shows successful deployment but the endpoint still does not display face or fingerprint options, the next step is to verify the actual hardware capability on that device.
If Windows Hello authentication later fails on the endpoint even after enrollment, review Windows Hello not working in Windows 11 for post-deployment troubleshooting.
Security Benefits of Deploying Windows Hello This Way
Deploying Windows Hello through Intune provides more than convenience. It strengthens endpoint authentication by reducing password dependency and aligning device sign-in with enterprise identity controls.
- Passwordless sign-in reduces phishing exposure
- Biometric authentication improves user convenience
- TPM-backed credentials improve credential protection
- Group-based assignment supports phased rollouts and tighter control
Windows Hello works especially well when combined with Conditional Access, MFA, and device compliance policies. For related enterprise hardening, review Windows Hello hybrid setup if your environment is hybrid, and hybrid cloud security benefits for broader identity planning.
Frequently Asked Questions
Can I enable Windows Hello only for specific Azure AD joined computers?
Yes. Assign the Intune configuration profile to a specific Azure AD device group so only those computers receive the Windows Hello policy.
Why does Use Windows Hello For Business (User) true show the setup notification?
Setting Use Windows Hello For Business (User) to True enables the user-level Windows Hello experience and prompts eligible users to configure sign-in methods such as PIN, fingerprint, or face.
Why is facial recognition unavailable even though the Intune policy is applied?
Facial recognition requires a supported Windows Hello IR camera. If the device does not have compatible hardware, Windows Hello Face will remain unavailable even when the policy is correctly deployed.
Do I need to enable both Use Windows Hello For Business (User) and (Device)?
In most enterprise deployments, yes. Enabling both settings gives a more consistent Windows Hello rollout and helps ensure the feature is available at both the device and user levels.
What should I do if fingerprint or face sign-in does not appear after policy assignment?
Run a manual Intune sync, restart the device, verify the computer is in the correct Azure AD group, and confirm the hardware supports the chosen biometric method.