Error 0x80004005 is one of the most frustrating and vague Windows errors you may encounter on Windows 10 or Windows 11. Unlike more descriptive error codes, this one is labeled as an “unspecified error,” which makes it difficult for users to identify the root cause. The error can appear in several scenarios: when extracting ZIP files, installing Windows Updates, accessing shared folders, or even activating Windows.
This comprehensive guide covers all the latest troubleshooting methods for resolving error 0x80004005, updated for Windows 11 (2025 builds) and Windows 10. We will also cover prevention tips, explain the causes, and provide expert-backed recommendations.
Understanding Error 0x80004005
The 0x80004005 error is defined by Microsoft as an “unspecified error.” Common triggers include:
- Failed Windows Update installations
- Corrupted or missing DLL files
- File extraction or ZIP archive issues
- Shared folder or permission errors
- Antivirus interference blocking system operations
Because it appears in multiple contexts, there isn’t a single fix. Instead, you must methodically troubleshoot using the following steps.
Step-by-Step Troubleshooting to Fix Error 0x80004005
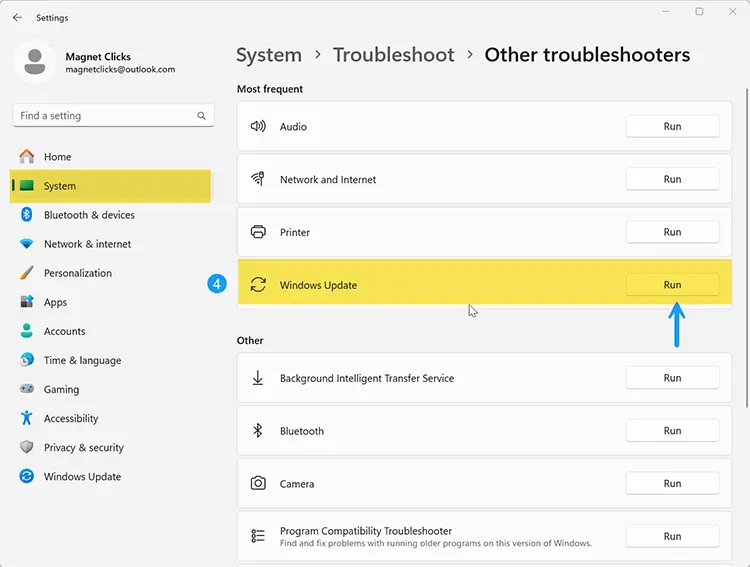
1. Run the Windows Update Troubleshooter
Windows has a built-in troubleshooter that detects and fixes update-related problems:
- Press Windows + I to open Settings.
- Go to System > Troubleshoot > Other troubleshooters.
- Find Windows Update and select Run.
2. Check for Windows Updates Manually
Sometimes updates stuck in the background can be manually triggered:
- Open Settings > Windows Update.
- Click Check for updates and install all pending updates.
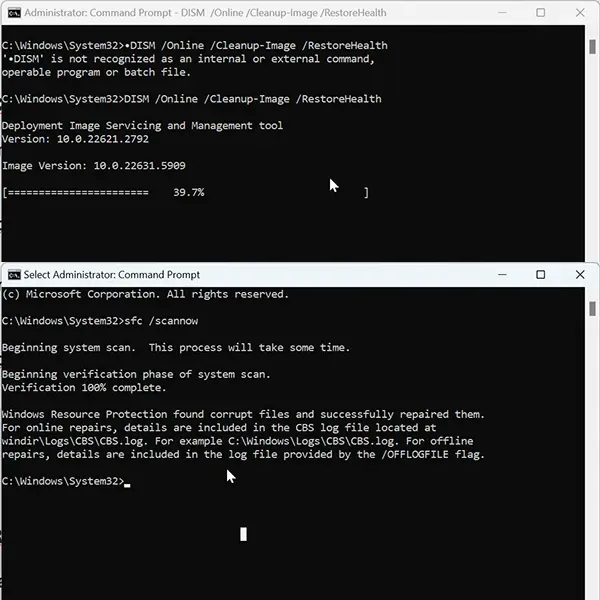
3. Use DISM and SFC to Repair System Files
Corrupted system files are a frequent cause of 0x80004005. Use DISM and SFC tools:
- Open Command Prompt (Admin).
- Run:
DISM /Online /Cleanup-Image /RestoreHealth - Once complete, type:
sfc /scannow
4. Disable Third-party Antivirus Temporarily
Antivirus programs can block essential Windows processes. Disable your antivirus temporarily to test if the error disappears. Important: Always re-enable it after troubleshooting.
5. Perform a Clean Boot
A clean boot starts Windows with only essential services, helping identify if background software is interfering:
- Press Windows + R, type
msconfig, and hit Enter. - Under Services, check Hide all Microsoft services and disable the rest.
- Restart your PC.
6. Fix ZIP File Extraction Errors
One common place you’ll see error 0x80004005 is when extracting compressed files. This usually happens if the ZIP file is password-protected or corrupted. To resolve:
- Use a third-party tool like 7-Zip or WinRAR.
- Ensure the file is fully downloaded (not partially corrupted).
7. Use the Registry Editor (Advanced)
Registry tweaks can sometimes resolve permission-related causes. Backup your registry first!
- Press Windows + R, type
regedit, and press Enter. - Navigate to:
HKEY_LOCAL_MACHINE\SOFTWARE\Microsoft\Windows\CurrentVersion\Policies\System - Set LocalAccountTokenFilterPolicy to 1 (create if missing).
8. Re-register DLL Files
Corrupted or missing DLL files may trigger this error. Try re-registering them:
- Open Command Prompt (Admin).
- Run:
regsvr32 jscript.dllandregsvr32 vbscript.dll.
Note: VBScript is deprecated in newer versions of Windows 11. Use this step only if running older builds.
9. Check Shared Folder Permissions
If error 0x80004005 appears when accessing a shared folder:
- Right-click the folder > Properties > Sharing tab.
- Ensure correct permissions are assigned for your user account.
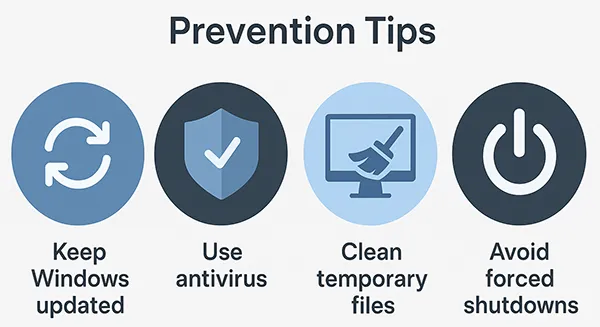
Prevention Tips
- Keep Windows fully updated.
- Run regular disk checks and clean up temporary files.
- Maintain reliable antivirus software.
- Back up your data before making registry changes.
Key Takeaways
Error 0x80004005 is vague but solvable. Whether triggered by Windows Updates, corrupted files, or permissions, systematic troubleshooting will help. Start with built-in tools like Update Troubleshooter and SFC/DISM, and progress to advanced fixes if needed.
Related Articles
- How to Clean Up Disk Space on Windows 11
- How to Fix a Frozen Windows and macOS Computer
- How to Delete Temporary Files in Windows 11
Frequently Asked Questions
What causes error 0x80004005 in Windows?
Common causes include corrupted system files, Windows Update failures, antivirus interference, and permission issues with shared folders.
Can Windows Updates trigger error 0x80004005?
Yes. Failed or incomplete updates often lead to this error. Running the Windows Update Troubleshooter usually resolves it.
Is it safe to edit the Windows Registry?
Yes, but only with caution. Always back up the registry before making changes. Incorrect edits can destabilize Windows.
Does disabling antivirus permanently fix the issue?
No. It only helps identify if antivirus is causing conflicts. You should configure or update your antivirus for long-term stability.
How can I prevent error 0x80004005 in the future?
Update Windows regularly, use reliable antivirus, avoid abrupt shutdowns, and perform routine system maintenance.
What is the meaning of error code 0x80004005?
It is a Windows error that stands for “unspecified error.” It usually appears during Windows Update failures, file extraction errors, or permission issues.
Does error 0x80004005 affect performance?
No, the error itself doesn’t slow down your PC. However, it may prevent you from installing updates, opening files, or accessing shared folders, which impacts usability.
Can error 0x80004005 prevent Windows activation?
Yes. In some cases, this error occurs when trying to activate Windows. If that happens, running the Activation Troubleshooter or re-entering your product key may fix it.
How do I fix error 0x80004005 when extracting ZIP files?
This error often occurs with corrupted or password-protected archives. Use tools like 7-Zip or WinRAR, or re-download the file to ensure it isn’t incomplete.
Is reinstalling Windows required to fix 0x80004005?
Usually no. Reinstallation is a last resort. Most users can resolve the issue using Windows Troubleshooter, DISM, SFC, or permission fixes without reinstalling Windows.