If your organization uses an operations mailbox like operations@magnetclicks.com, you may want to automatically route certain messages to the right person without manually checking and forwarding emails all day. A common example at MagnetClicks is routing content-related messages — like those mentioning “tutorials” or “functions” — directly to the editor at editor@magnetclicks.com.
The most reliable and professional way to do this in Microsoft 365 is with an Exchange Mail Flow Rule (also known as a Transport Rule). Unlike Outlook inbox rules, mail flow rules run at the server level. That means they still work even if nobody is signed into the mailbox.
In this guide, you’ll set up one simple automation:
- Condition: operations@magnetclicks.com receives an email where the subject OR body contains tutorials or functions
- Action: redirect (forward server-side) that email to editor@magnetclicks.com
You’ll get step-by-step instructions for both the Exchange Admin Center (GUI) and PowerShell, plus visual references for every step and a troubleshooting checklist.
Why Mail Flow Rules (Transport Rules) Are Better Than Inbox Rules
Microsoft 365 provides multiple ways to route messages, but not all methods are ideal for an operational mailbox.
- Inbox rules (Outlook): Usually configured by a user and can be inconsistent across shared mailboxes.
- Mailbox forwarding: Useful if you want to forward all messages, but it does not give you keyword-based logic.
- Mail Flow rules: Centralized, auditable, and designed for conditional routing — perfect for keyword-based editorial automation.
If you’re building operational processes in Microsoft 365, transport rules align well with secure workflow practices like Multi-Factor Authentication and centralized controls.
Redirect vs Forward: Choose the Right Action
In Exchange rules, you’ll commonly see choices like Forward, Redirect, or Add recipients. For this scenario, Redirect is the best option.
- Forward: The message looks like it was forwarded by operations@ (can clutter tracking and conversation threads).
- Redirect: Preserves the original sender and headers, so the editor receives it more “natively.”
For editorial workflows and automation routing, Redirect keeps everything cleaner and reduces confusion.
What You Will Build
You will create a rule that triggers only when:
- The message is addressed to operations@magnetclicks.com
- The subject or body contains tutorials OR functions
Then it will:
- Redirect the message to editor@magnetclicks.com
- Optionally prevent loops with a simple exception
Method 1: Exchange Admin Center (GUI) — Visual Step-by-Step
Step 1: Open Exchange Admin Center
Sign in to the Exchange Admin Center using an admin role that can manage mail flow (Exchange Admin or Global Admin). Once inside, you should see the left navigation menu.
Step 2: Navigate to Mail Flow Rules
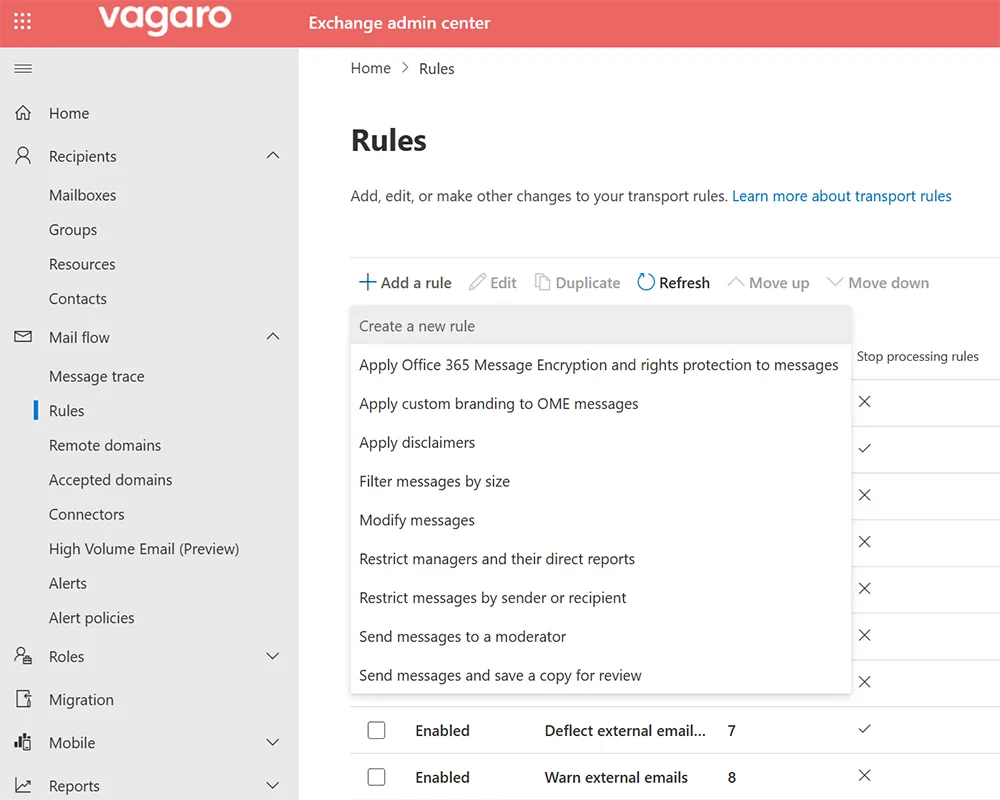
In the left menu, click Mail flow, then click Rules. This is where transport rules are created and prioritized.
Step 3: Create a New Rule
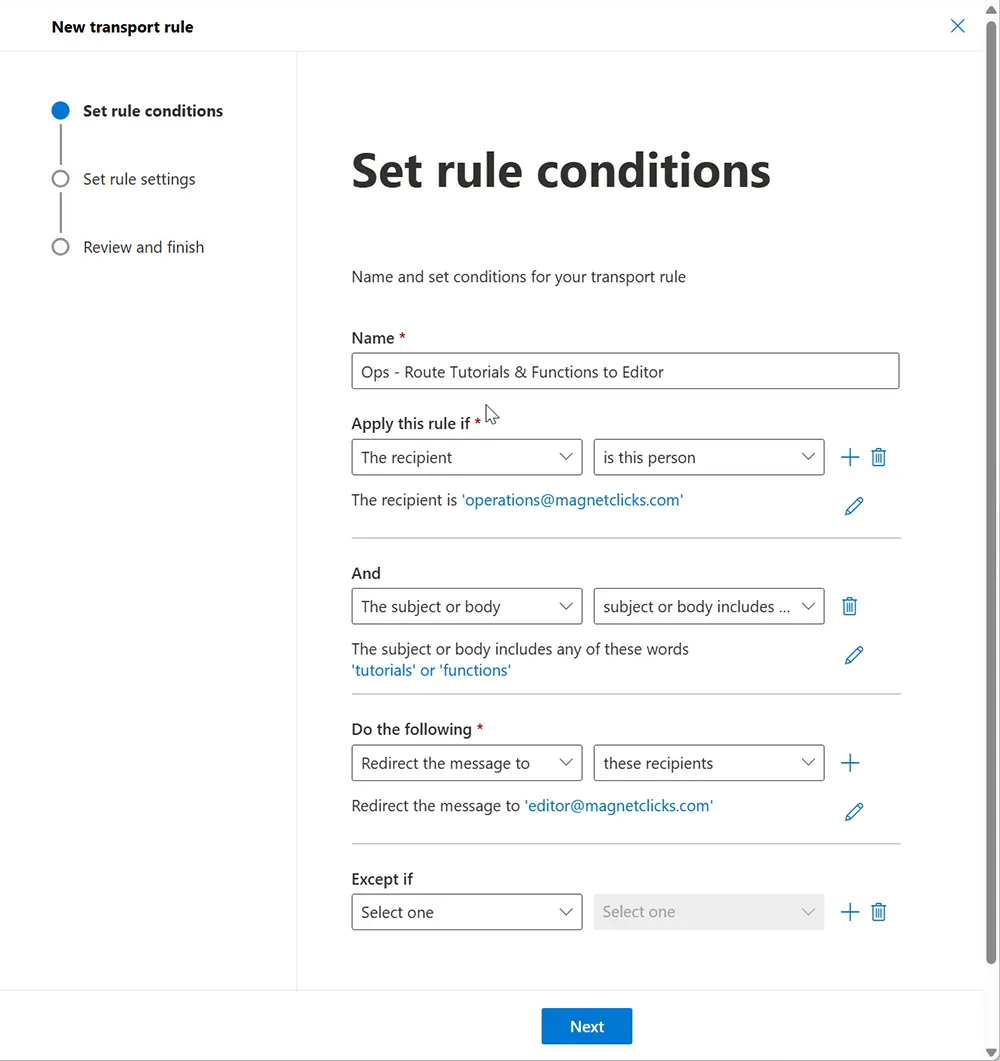
Click Add a rule and select Create a new rule. Use a naming convention that makes it easy to audit later (example: starts with “Ops – ”).
Step 4: Name the Rule
Suggested name:
Ops - Route Tutorials & Functions to EditorStep 5: Add Condition #1 (Recipient is operations@)
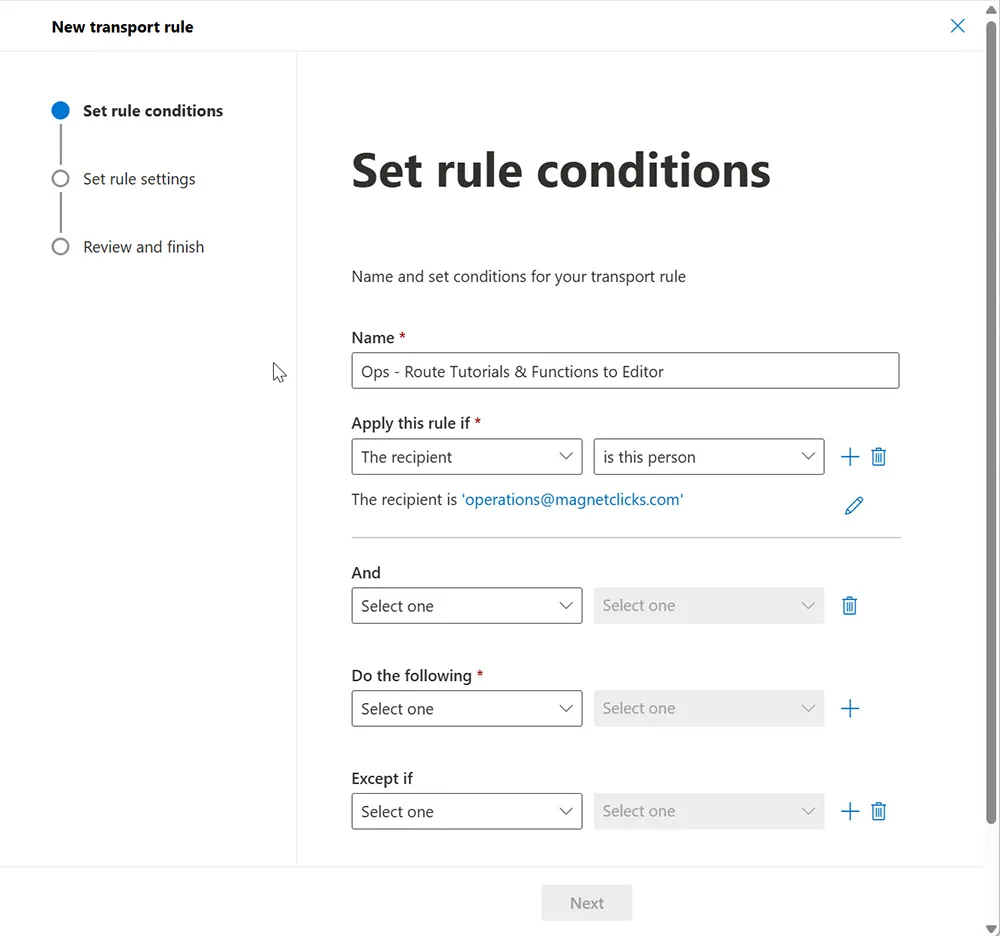
Set the first condition to target only messages going to the operations mailbox. This ensures the rule doesn’t trigger for unrelated mail.
Step 6: Add Condition #2 (Subject or body includes keywords)
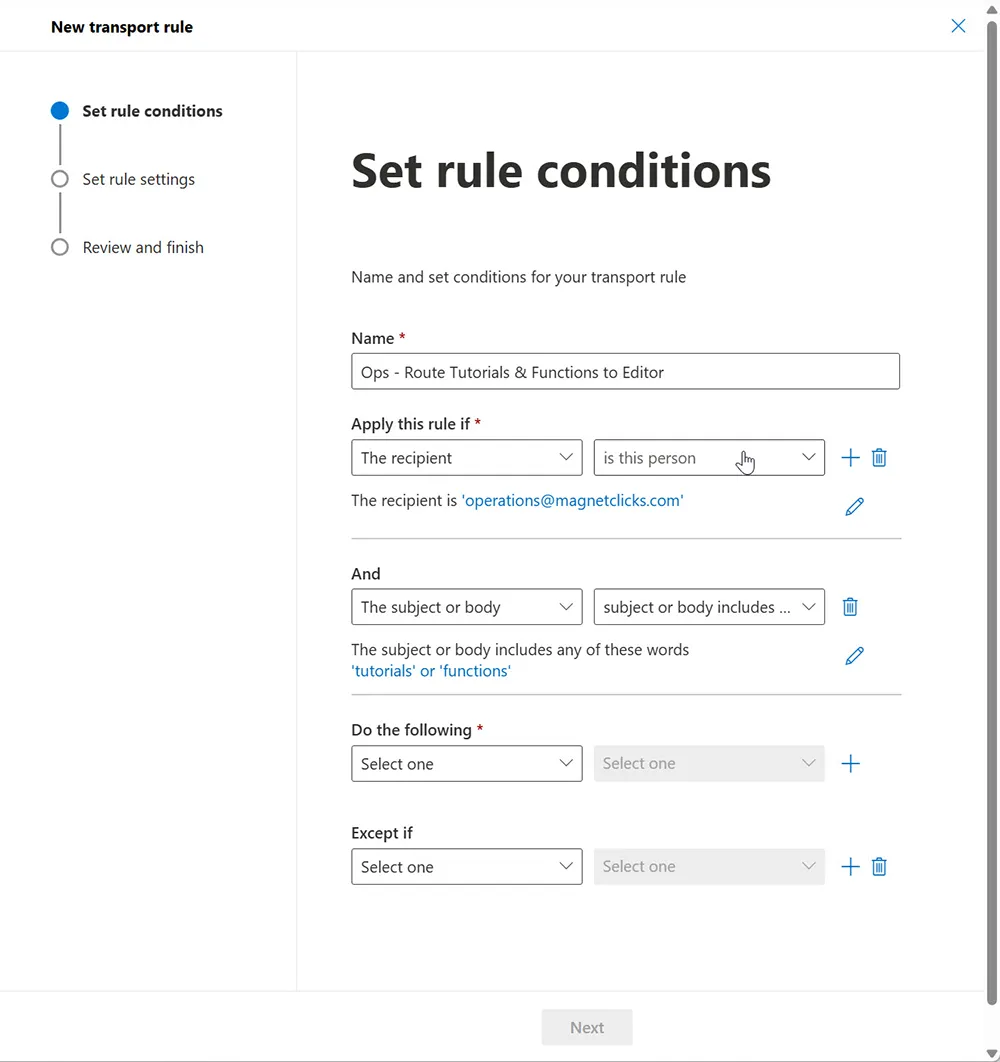
Add the keywords:
tutorials
functions
This condition behaves like OR for keywords: if the subject/body contains either word, the condition matches.
Step 7: Add the Action (Redirect to editor@)
Choose Redirect the message to and select editor@magnetclicks.com.
Step 8: Add Safety Controls (Stop processing + Anti-loop)
Add an exception to reduce the chance of accidental loops in future rule expansions:
- Except if → the recipient is editor@magnetclicks.com
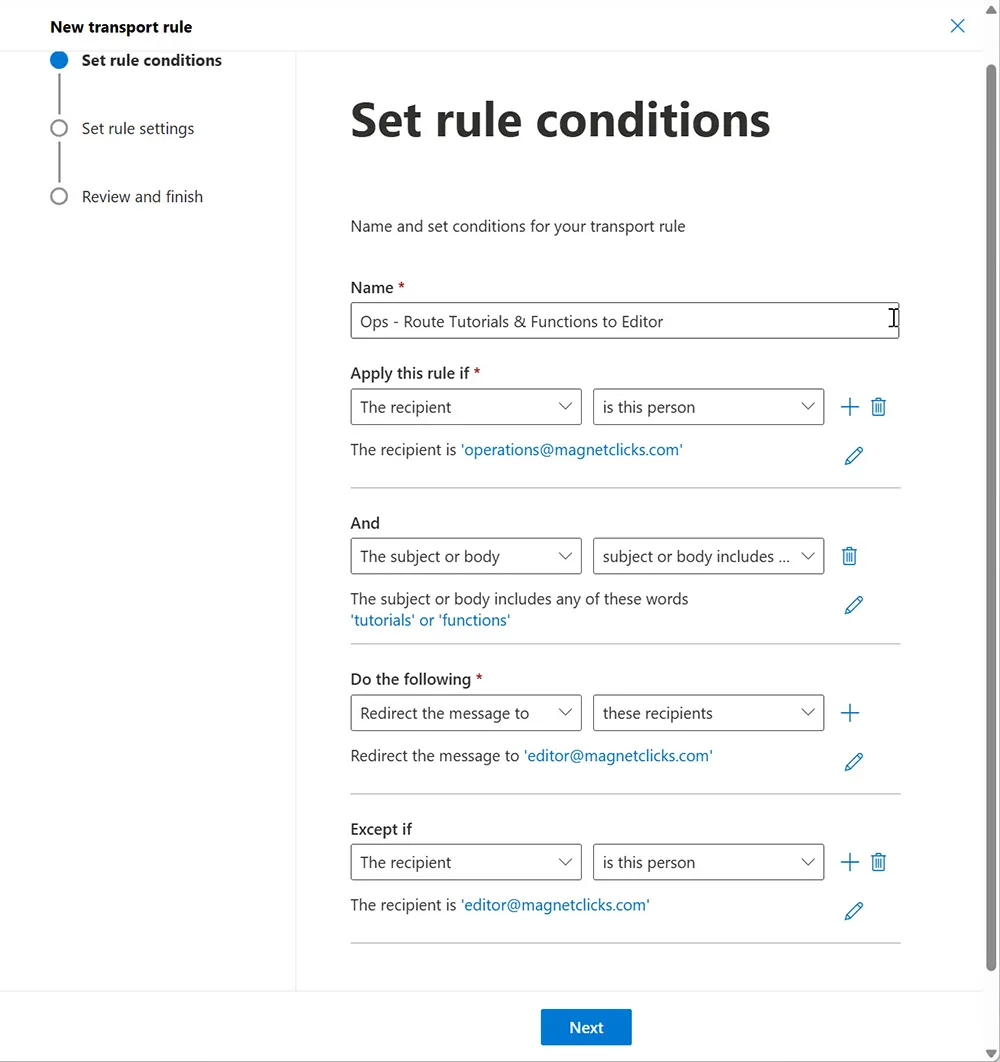
Enable:
- Stop processing more rules (prevents conflicts)
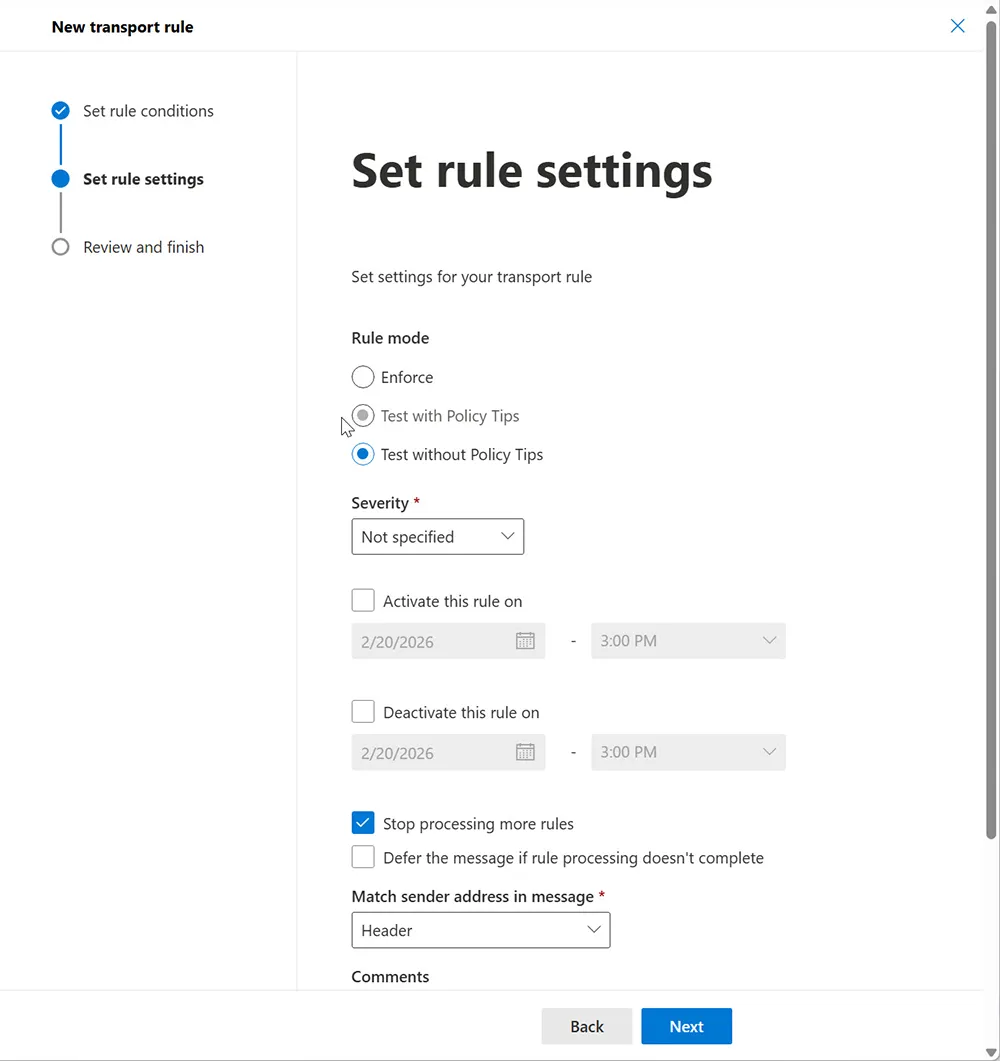
Step 9: Save and Confirm Rule Priority
After saving, confirm the rule exists and appears in the correct order (top-to-bottom priority). If you later add more rules (e.g., for different keywords), put the most specific rules above more general ones.
Method 2: PowerShell (Exchange Online) — Visual Step-by-Step
PowerShell is best for documentation, repeatability, and change control. If you automate environments often, PowerShell is also the cleanest way to keep an audit trail.
Step 1: Connect to Exchange Online

Connect-ExchangeOnlineStep 2: Create the Transport Rule
New-TransportRule -Name "Ops - Route Tutorials & Functions to Editor" `
-SentTo "operations@magnetclicks.com" `
-SubjectOrBodyContainsWords "tutorials","functions" `
-RedirectMessageTo "editor@magnetclicks.com"
Step 3: Add an Anti-Loop Exception
Set-TransportRule "Ops - Route Tutorials & Functions to Editor" `
-ExceptIfSentTo "editor@magnetclicks.com"
Step 4: Verify the Rule
Get-TransportRule "Ops - Route Tutorials & Functions to Editor" | flTesting the Rule (Visual Checklist)
Step 1: Send a Test Email That Matches
Test examples:
To: operations@magnetclicks.com
Subject: New tutorials draft ready for review

Body:
Please review these tutorials updates for publication.
Step 2: Confirm Delivery in editor@ Inbox
Because the rule uses Redirect, the message should look like it was delivered normally (not obviously “forwarded by operations@”).
How to Validate With Message Trace (When Users Say “It Didn’t Work”)
In Exchange Admin Center:
- Go to Mail flow → Message trace
- Search for the sender and recipient operations@magnetclicks.com
- Open the message details and look for “rule applied” indicators
If your workflow depends on accurate email routing (like editorial submissions), it’s also worth keeping good security hygiene around mail accounts, including monitoring whether a mailbox address was ever leaked in breaches. You can learn more at Email Exposed in a Breach.
Common Mistakes and Quick Fixes
Mistake 1: Using “Forward” Instead of “Redirect”
Fix: Edit the rule and switch the action to Redirect so the editor receives clean headers and the original sender.
Mistake 2: Rule Not Triggering Due to Wrong Condition
Fix: Ensure the condition is set to Subject or body includes and that keywords are spelled correctly.
Mistake 3: Another Rule Runs First
Fix: Move your rule higher in priority and enable Stop processing more rules.
Mistake 4: Testing With the Wrong Mailbox
Fix: Confirm the test email is sent directly to operations@magnetclicks.com (not a distribution group or alias unless your rule targets that exact recipient).
Security Notes for Operational Mailboxes
Mail flow rules are powerful — and that power means they should be managed like any other change in your IT environment. As a best practice:
- Limit who can create/modify transport rules
- Document rule purpose and expected behavior
- Review rules periodically as part of operational maintenance
If you’re modernizing IT operations with automation, you may also like: AI Benefits in IT Operations and Future of Network Automation.
Frequently Asked Questions
Does this work for shared mailboxes like operations@?
Yes. Mail flow rules run at the Exchange server level and apply regardless of whether a mailbox is shared or regular.
Why should I use Redirect instead of Forward?
Redirect preserves the original sender and headers, which keeps editorial workflows cleaner and more reliable.
Can I add more keywords later?
Yes. Edit the rule and add additional words to the “subject or body includes” keyword list. Keep your list focused to avoid false matches.
How do I prove the rule applied to a specific email?
Use Message trace in Exchange Admin Center and open the message details to see the transport rule actions.
What if emails contain “function” instead of “functions”?
Add both “function” and “functions” to the keyword list if you want both variants to match.